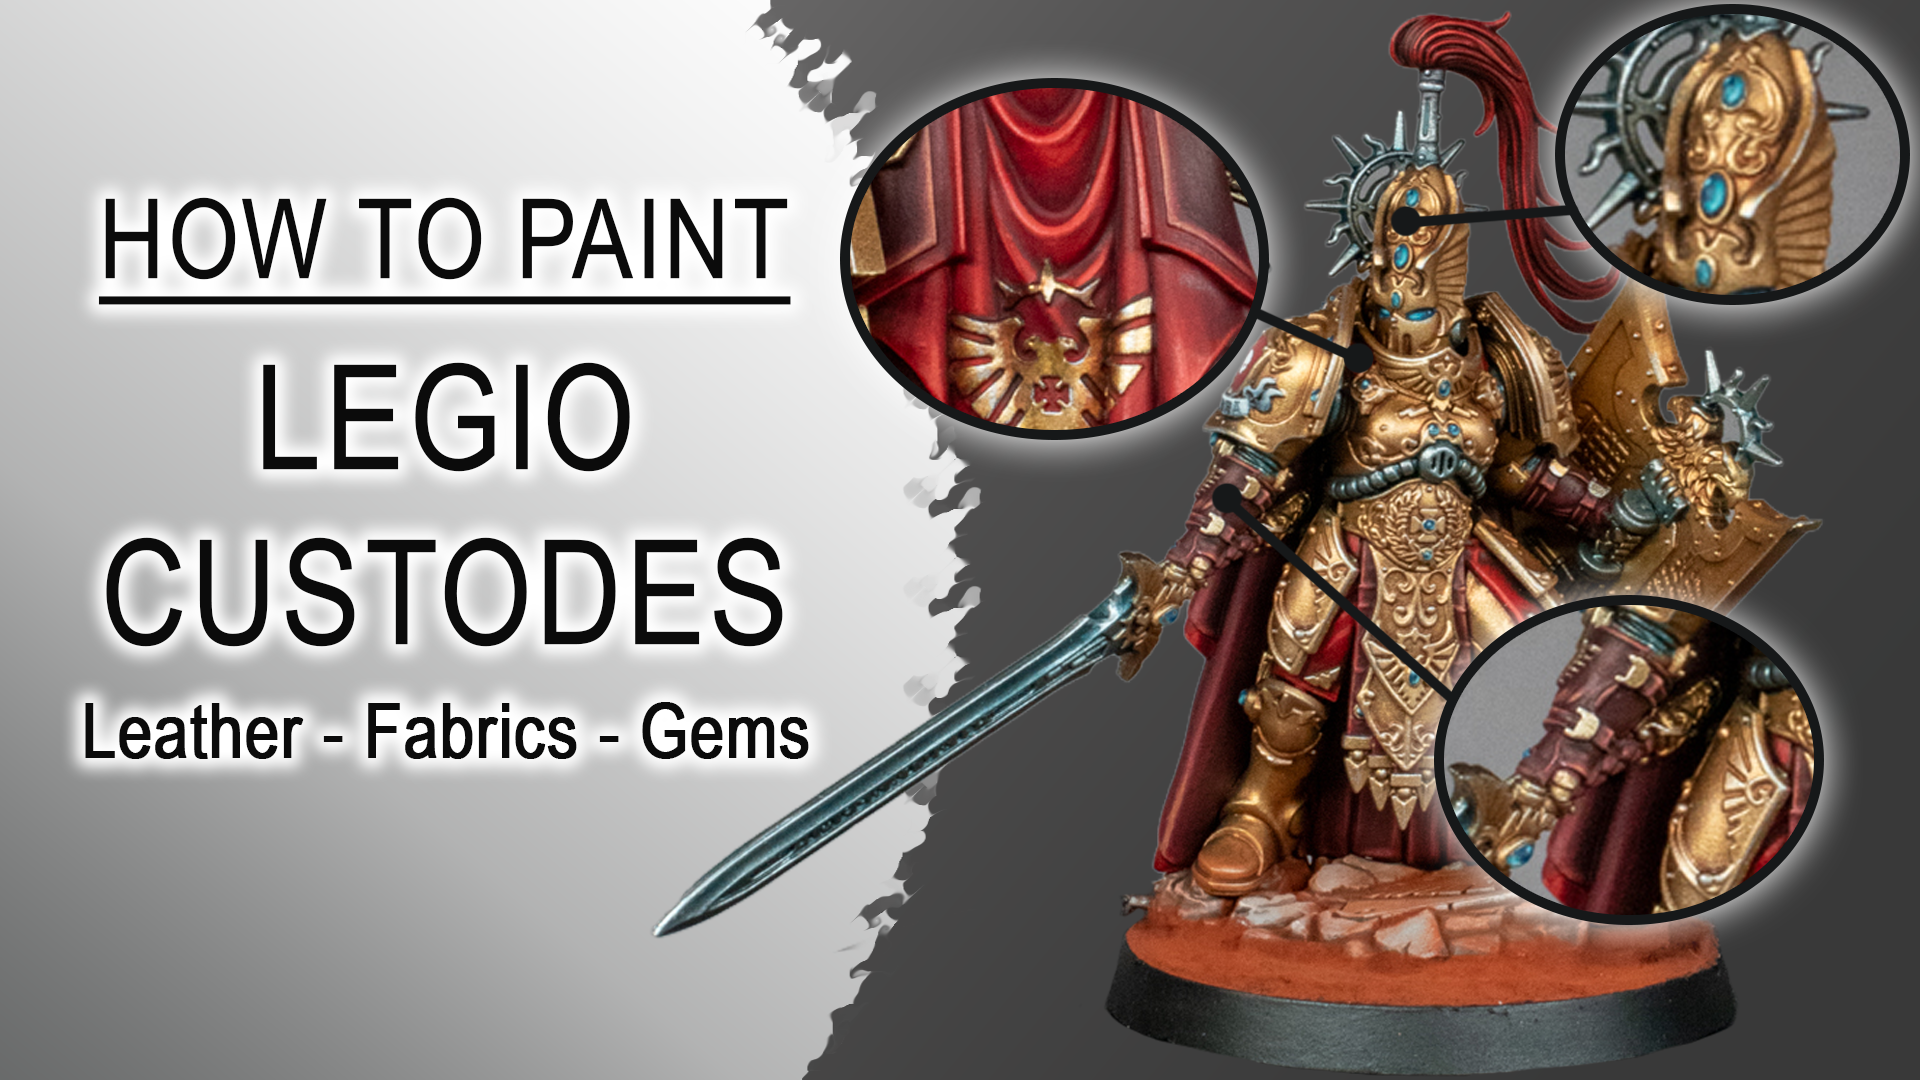
The rich red fabrics, deep leather tones, and bright gemstones are what give Adeptus Custodes their visual hierarchy and character. In Part One of this guide, we established a clean metallic foundation using thin films, low‑tension washes, and controlled volumetric highlights. This second part builds on that base by developing the contrasting materials that frame the armor: the cloak, leather straps, unit markings, and gemstones.
The goal is the same—smooth transitions, crisp definition, and strong material separation—using a repeatable workflow that keeps the miniature readable at arm’s length while still rewarding close inspection. All steps shown here were demonstrated on the same Shield‑Captain used in Part One, ensuring full continuity between both guides.
| Brand | Name |
|---|---|
| Artis Opus | Series D – Brush Set, Series S – Brush Set GET 5% Discount on Artis Opus Brushes ! Discount Code: PLAGUENARR |
| Citadel | Mephiston Red, Khorne Red, Evil Sunz Scarlet, Wild Rider Red, Squig Orange, Jokaero Orange, Abaddon Black, Kantor Blue, Thousand Sons Blue, Sybarite Green |
| P3 | Morrow White |
Step 1 – Leather & Leg Fabric Basecoat
Basecoat all leather parts and the fabric sections on the legs with a 3:1 mix of Khorne Red and Abaddon Black. These leg fabrics sit at awkward angles, so starting darker makes the later highlight stages cleaner and more controlled. Use thin, even layers to avoid texture buildup. Brush: Artis Opus Series S (Size 0).
Step 2 – Main Fabric Basecoat
Basecoat all cloak fabrics, the helm plume, and unit markings with Mephiston Red thinned 1:1 with water. This mix requires around three coats for full coverage but preserves all sculpted detail. Brush: Artis Opus Series S (Size 0).
Step 3 – Leather Recess Shading
Shade all leather recesses with a 1:1:1 mix of Mephiston Red, Abaddon Black, and Water. Apply this selectively into folds, undercuts, and deep lines to establish structure. Brush: Artis Opus Series S (Size 0).
Step 4 – Leather Highlights (Khorne Red)
Using pure Khorne Red, begin highlighting all leather areas. Use volumetric highlights on raised, light‑facing surfaces and add sharper edge highlights to corners for definition. Brush: Artis Opus Series S (Size 00). Optional: A gel pen can help refine micro‑edges.
Step 5 – Leather Highlights (Khorne Red + Squig Orange)
Mix 1:1 Khorne Red and Squig Orange and repeat the previous highlight pattern. Reduce the size of both volumetric and edge highlights by roughly one third to build a clean transition. Brush: Artis Opus Series S (Size 00).
Step 6 – Final Leather Highlights (Squig Orange)
Finish the leather with pure Squig Orange. Add small, bright reflections on raised areas and crisp edge highlights on corners to create a polished finish. Brush: Artis Opus Series S (Size 00).
Step 7 – First Fabric Highlights (Mephiston Red Glaze)
Create a 1:3 mix of Mephiston Red and Water and apply volumetric glaze highlights across the cloak and leg fabrics. Push the highlights toward the upper, light‑facing areas while keeping lower sections darker for natural shadowing.
Step 8 – Soft Cloak Shadows (Khorne Red Glaze)
Mix 1 part Khorne Red with 2 parts Water and glaze soft shadows into the lower folds and recesses of the cloak. Apply 2–3 thin layers to build smooth transitions.
Step 9 – Deep Cloak Shadows (Khorne Red + Abaddon Black)
Mix 2 parts Khorne Red, 1 part Abaddon Black, and 3 parts Water to create a deep shadow glaze. Use it in two ways:
- As a recess shade: load the brush and place it directly into panel lines and edges.
- As a glaze: wipe most paint off and glaze into the deepest folds for rich shadow depth.
Step 10 – Midtone Restoration (Mephiston Red)
Use a 1:1 mix of Mephiston Red and Water to restore midtones, smooth transitions, and add highlights to raised areas that may have been dulled during shading. Brush: Artis Opus Series S (Size 1).
Step 11 – Intense Highlights (Evil Sunz Scarlet)
Mix 1 part Evil Sunz Scarlet with 1 part Water and apply intense highlights to raised fabric areas. Blend softly into the layers below to maintain smooth transitions. Add small reflection points on areas that should visually pop. Also apply these highlights to the leg fabrics.
Step 12 – Final Fabric Highlights (Wild Rider Red)
Mix 1 part Wild Rider Red with 1 part Water and add thin edge highlights to all fabric edges and corners. Place small, bright reflection dots on raised areas to increase overall contrast. Repeat this on the leg fabrics as well.
Step 13 – Gemstone Basecoat
Basecoat all gemstones with a 1:1 mix of Kantor Blue and Water. Apply one smooth, even layer.
Step 14 – Gemstone Midtone Highlight
Mix 1:1:1 Thousand Sons Blue, Sybarite Green, and Water. Paint a highlight covering roughly one third of the gemstone, placed on the shadowed side to create depth.
Add a small dot highlight on the opposite side to simulate a light reflection.
Step 15 – Bright Gemstone Highlight
Add one part P3 Morrow White to the previous gemstone mix and repeat the highlight pattern with a smaller shape. This increases contrast and curvature.
Step 16 – Final Gemstone Reflections
Use pure P3 Morrow White to:
Place a crisp white dot at the center of the previous highlight for maximum brilliance
Add a thin reflection line in the shadowed area
Intensify the upper reflection dot