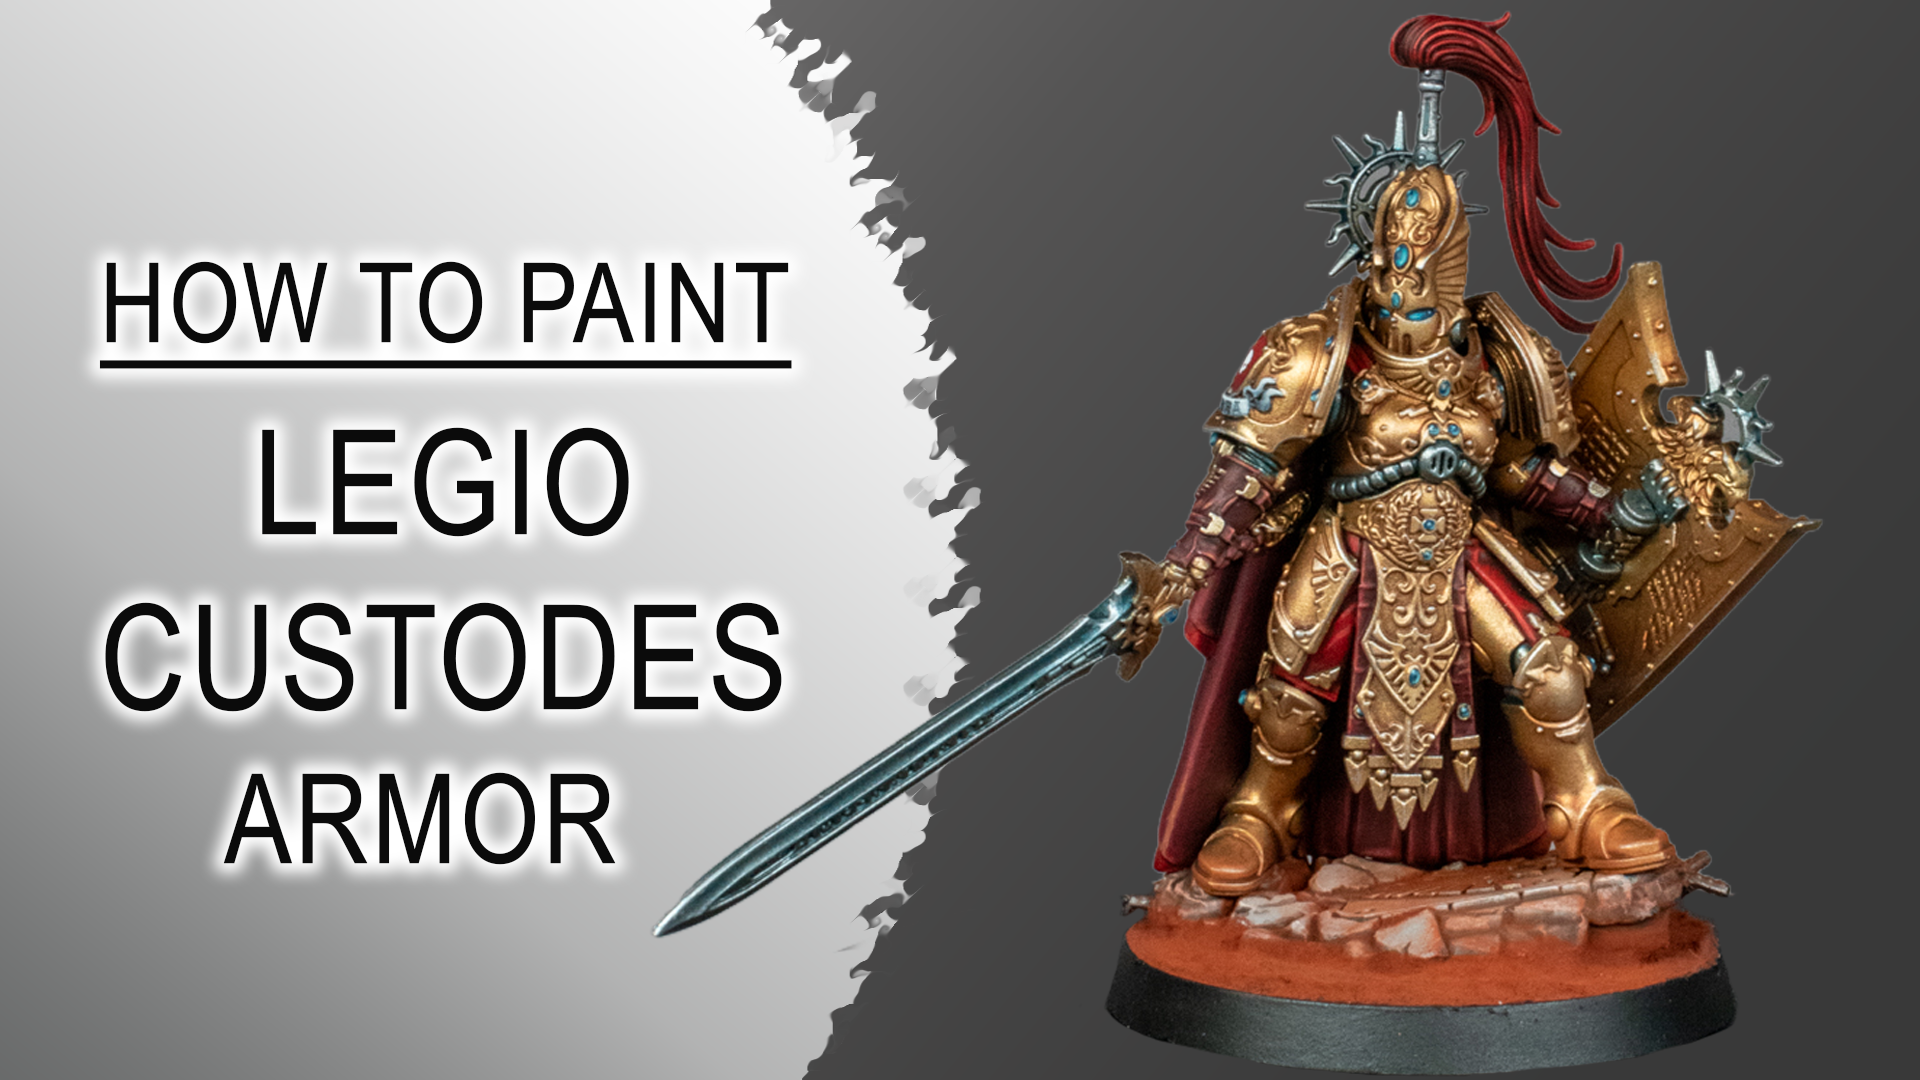
Thin, believable metallics are one of the hardest things to get right on Adeptus Custodes. In this first part of my Custodes TMM guide, I break down a complete armor and metallics workflow built around ultra‑thin metallic films, low‑surface‑tension washes, and controlled drybrushing. The goal is a repeatable process that keeps the gold rich, the silver cool and sharp, and the overall read clean—without using any masking.
This article covers every step I used on a Custodes Shield‑Captain, from the first black prime to the final micro‑highlights on the armor. Part two will focus on the cloak, leather and gems, and how they tie into this metallic foundation.
| Brand | Name |
|---|---|
| Artis Opus | Series D – Brush Set, Series S – Brush Set GET 5% Discount on Artis Opus Brushes ! Discount Code: PLAGUENARR |
| Citadel | Basilicanum Grey, Lahmian Medium, Guilliman Flesh, Talassar Blue |
| Monument Hobbies Pro Acryl | Pro Acryl Expansion Set Metallics GET 5% Discount on Monument Hobbies products! Discount Code: PLAGUENARR |
| Gaahleri | 12 Metal Colors Set GET 10% Discount on Gaahleri products! Discount Code: Plaguenarr |
| Vallejo | Pigment FX, Burnt Sienna, Airbrush Thinner, Airbrush Flow Improver, Dark Aluminium |
Step 1 – Prime and preparation
Prime the miniature black. I work in sub‑assemblies so I can reach awkward angles and covered details without building up unnecessary paint thickness. A clean black prime gives strong shadow definition and makes it easier to judge the transparency of the metallic layers.
Step 2 – Gold basecoat with thin metallic film
For the gold armor, I use Gaahleri Kaleido Acrylics – Champagne Gold. The key idea here is film thickness: I want a very thin metallic layer that doesn’t obscure detail or look “chunky”. With an airbrush, apply multiple ultra‑thin passes until you reach an even coverage. If you’re using a brush, work with several very thin coats instead of one heavy layer. The paint’s fluidity and fine pigment help keep the surface smooth.
Step 3 – Low‑surface‑tension wash for gold shading
To establish initial shading without shifting the gold too far in color, I mix a custom low‑surface‑tension wash:
- 5 drops Guilliman Flesh
- 3 drops Lahmian Medium
- 2 drops Airbrush Thinner
- 1 drop Flow Improver
The medium and thinner reduce surface tension so the wash flows into recesses instead of staining flat areas. Apply this panel by panel over the gold armor, letting it settle into lines and undercuts. This creates warm red‑brown shadows while preserving the main Champagne Gold tone.
Step 4 – Rebuilding gold midtones with drybrushing
After the wash, the gold can look slightly dulled. To bring the midtones back and start building volume, I drybrush Gaahleri – Champagne Gold again. I use an Artis Opus Series D (Size M+) with a texture palette and dampening pad. Load the brush, work most of the paint out, then use circular motions over the armor. This technique rebuilds the gold on raised areas while leaving the shaded recesses intact, creating soft volumetric highlights.
Step 5 – Bright gold volumetric highlights
Next, I push the highlights with Pro‑Acryl – Bright Gold. This paint has very fine, strong pigments and a fluid consistency, which makes it ideal for thin, bright layers. Using the same Series D (Size M+) brush, I drybrush in circular motions again, but now I focus on upper and forward‑facing surfaces: chest, shoulders, helmet crest, and other areas that would catch the most light. This step establishes a clear light direction and a brighter gold read without losing the underlying tone.
Step 6 – Silver basecoat
Before finishing the gold, I block in all silver metallics with Vallejo – Dark Aluminium. This includes the sword, crown, power cables, subsuit, helmet details and shield elements. Doing this at this stage lets me handle later drybrushing and highlighting across all metallics more efficiently, instead of treating gold and silver completely separately.
Step 7 – Cool low‑tension wash for silver
For the silver shading, I want a cooler, slightly blue recess tone to contrast the warm gold. I mix another low‑surface‑tension wash:
- 5 drops Basilicanum Grey
- 2 drops Talassar Blue
- 6 drops Lahmian Medium
- 6 drops airbrush thinner
- 1 drop flow improver
Apply this mix panel by panel over the silver areas. The Basilicanum Grey and Talassar Blue combination creates a blue‑grey shade that settles into recesses and grooves, giving the silver a cool, slightly Grey Knights‑inspired feel that plays nicely against the red‑tinted gold shadows.
Step 8 – Muting the blue with a silver drybrush
After the wash, the silver can look a bit too blue. To balance it, I lightly drybrush Vallejo – Dark Aluminium again. Here I switch to an Artis Opus Series D (Size XS+) for better control on small details. With minimal paint on the brush, gently pass over raised areas to reintroduce neutral metallic midtones while keeping the cool recesses intact.
Step 9 – Sharp silver edge highlights
With the silver balanced, I add sharp highlights using Pro‑Acryl – Silver. Using an Artis Opus Series D (Size S+), I apply precise edge strikes to armor trim, bolts, weapon edges and other hard lines. The goal is to increase perceived sharpness and material definition without overwhelming the gold or turning the whole scheme too silver. Keep the highlights selective and controlled.
Step 10 – Deep silver recess glazes
To push depth in specific areas, I mix a glaze on the wet palette:
- 2 parts Basilicanum Grey
- 1 part Talassar Blue
With an Artis Opus Series S (Size 1), I wipe most of the paint off and glaze this mix into the deepest recesses of the silver—sword grooves, undercuts, and shadowed mechanical details. For very deep recesses, you can load the brush a bit more and carefully flood the area. This adds a final layer of depth without creating harsh transitions.
Step 11 – Gold armor glazes
Now I return to the gold to unify the tones. I thin Guilliman Flesh with water to a glazing consistency and apply it with an Artis Opus Series S (Size 1). Glaze into panel lines, undercuts and shadowed areas of the gold armor. This step reintroduces warmth into the shadows and ties the Champagne Gold and Bright Gold layers together into a cohesive surface.
Step 12 – Final edge and spot highlights
The last step for the metallics is micro‑highlighting. With an Artis Opus Series S (Size 1) and Pro‑Acryl – Silver (or a similar bright metallic), I place tiny spot highlights and edge lines on the sharpest armor edges, bolts and weapon tips—both on gold and silver areas. These small, high‑value points are what make the metal look crisp and finished when viewed at arm’s length.